Notification Logger - User Manual
1. Introduction
Welcome to Notification Logger! This manual will guide you through the features and functionality of the application.
Notification Logger is a powerful tool for Windows 10/11 that creates a persistent history of all your notifications. Whether you've accidentally dismissed an important alert or need to find a specific message from days ago, this app has you covered.
2. Getting Started
Installation
Notification Logger can be installed from the Microsoft Store.
Permissions
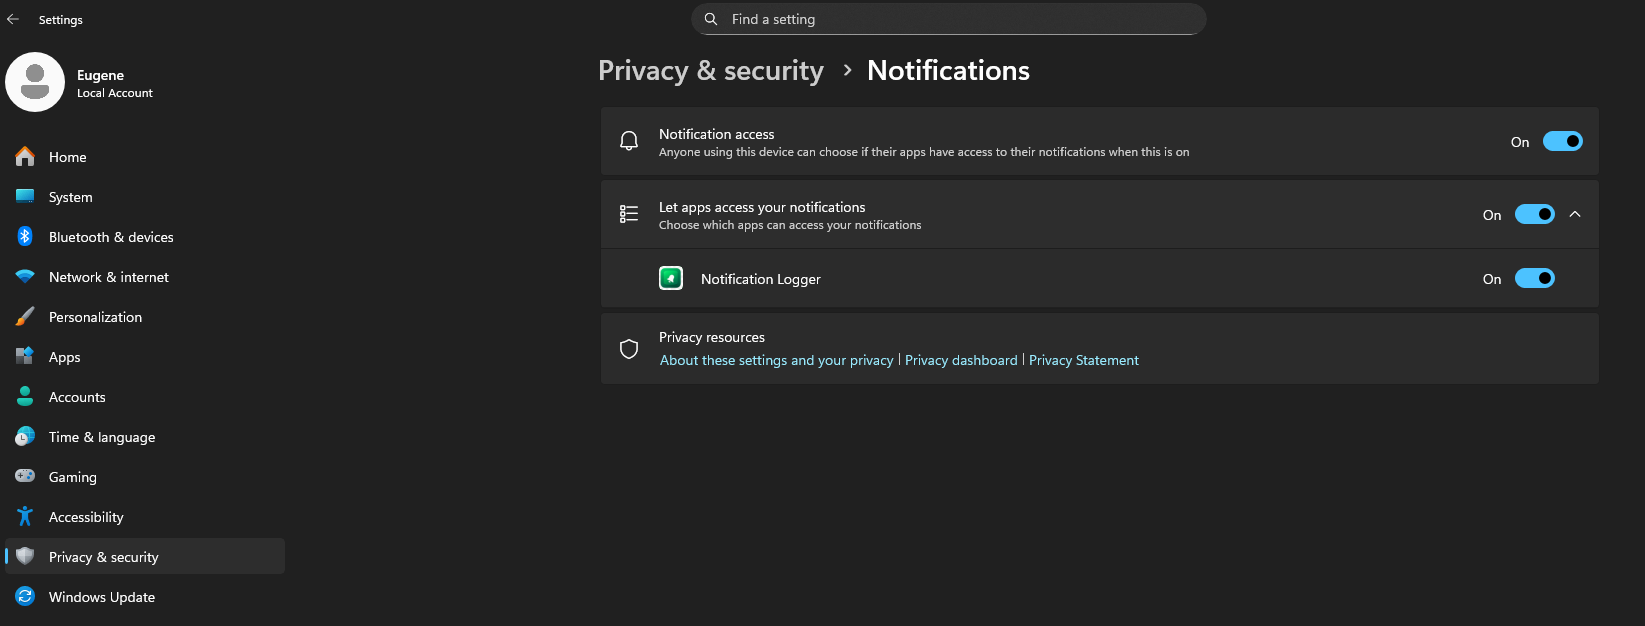
For the app to function, it needs permission to access your Windows notifications. Upon first launch, you may be prompted, or you can set it manually:
- Go to Windows Settings.
- Navigate to Privacy & security > Notifications.
- Ensure "Allow apps to access your notifications" is toggled On.
- In the list of apps, find Notification Logger and toggle it On.
Once enabled, the app will immediately begin logging all new incoming notifications.
3. The Main Window
The main window is where you'll interact with your notification history. It consists of a powerful grid view with several key components:
- Search Bar: Quickly find notifications by typing keywords. The search covers the content of all your logged notifications.
- Filters: Filter by app name, notification text, date and time, and ID to find needed information faster.
- Notification Grid: This is the central part of the app, displaying your notifications. You can see the sending application, the notification title, the content, and the date it was received.
- Favorites: A column or icon (e.g., a star) allows you to mark specific notifications as favorites for easy access later.
- Toolbar: Contains buttons for key actions like Refresh, Export, Settings, and filtering for Favorites.
4. Key Features
4.1. Searching and Filtering
You can instantly find any notification using the Search Bar at the top. For more advanced filtering, you can use the date range selector to only show notifications from a specific period.
4.2. Grouping Notifications
To better organize your view, you can group notifications. Click on a "Group" button, and this will collapse your notifications into expandable groups, making it easy to see all notifications from a single app.
4.3. Favorites
If you receive a notification you know you'll need later, mark it as a Favorite. You can then click the "Favorites" filter button in the toolbar to instantly see only your starred notifications. Favorite notifications will never be deleted in the future. If you want to delete a favorite notification, you need to unfavorite it first.
4.4. Exporting Your History
You can export your notification history for backup or analysis.
- Click the Export button in the toolbar.
- An "Export" dialog will appear. You can press the Copy button to save the exported CSV file path to the clipboard.
- Click Save.
5. Settings
You can access the settings by clicking the Settings (gear) icon. Here you can configure:
- Language: Switch between one of the 15 world's most popular languages.
- Theme: Switch between a light and dark theme to match your preference.
- Auto-refresh: If enabled, the notification grid will be refreshed automatically in the specified amount of seconds. If not, please use the Refresh button to update the notifications grid.
- Regular expressions: The option enables regular expressions filtering in the Search Bar.
- Copy cell text to clipboard: This option enables text copying to the clipboard on cell double-click.
- Data Retention: Set the number of days you want to keep notification history in the "Clean notification older than __ days" field. Please note that notifications marked as favorites will never be deleted.

